
Framing a Raleigh Speedway Asphalt Remnant
Updated: Jul 23

So to date the most challenging and satisfying mounting/framing was the Egyptian Papyrus on Burlap, and the one I am going to describe, while much smaller in scale, proved to be a very close second.
Months ago, a gentleman happened to swing by the shop looking for Dead Wax Records (in the shop in front of me). He inquired about what services and products I offer, and 3 or 4 weeks ago, came in with a couple projects - one was a $50 bill signed by Brandon Bussi #32 of the Carolina Hurricanes after the Stanley Cup Final - they ran into him in a restaurant after the game I think.

A cool project in itself, but then he hands me a zip-lock back with a 5lb (guessing) chunk of asphalt from the original Raleigh Speedway (which operated from 1952-1958). He wanted it framed...what else could I say...."OK!".
Needless to say, the international framing blogs didn't offer much opportunity for object mounting a chunk of asphalt, so I deliberated on it for a week and then jumped in. I knew there were a couple attributes which would apply to this project:
Completely reversible, i.e. no glue or screws or anything destructive to the asphalt. This wasn't too challenging as you will see following, but it did tend to crumble pieces all over the place and we agreed that any falling debris in the final framing would be "part of the charm". Truth be told, I did make a test drill hole to see if I could anchor with some screws and angle brackets, but the asphalt proved too brittle.
Next was figuring out how to a mat behind this or around it. The chunk was about 7"h x 4"w x 3" tall, so a shadowbox was going to be necessary. Fortunately, on one of my retired framer buyouts, he had a large quantity of a nice generic black moulding which worked with extenders 1-1/4" and 2-1/4" - so we went with it and used the 2-1/4" extender.
Structurally, we needed to have a lot of support. This was deal with using a 1/4" piece of plywood and then worked out the target shape and used a jigsaw to cut the opening. Also followed with a foam support cradle in the back that completely (or mostly) surrounded and supported the asphalt.
Here was the general layout we wanted to work towards. He also wanted to put a photo of th race track in the day and a plaque - I won't go into those too much, but the plaque was done with the laser printer and the photo I found on the internet and used some of our photo enhancing tools to make it shine.:

For the mounting, I priced this assuming about a 3 hour job, and realistically, ended up with about 6 hours on just the mounting. That said, a lot of that was initial learning and an investment in knowledge that will help with future complex jobs, so I knew I would be under, but that was OK.
Defining the Shape of the Asphalt, Cut Mat and Primary Support Panel
The first step was to get a template that would be used for both the matboard cutout and the 1/4" plywood behind it that would be the primary support for the asphalt. After some trial and error, eventually I found a good shape that would allow the asphalt to be about 1/2" proud of the mat board.


Next was to trace the pattern into the target mat board and using a small Dexter mat cutter, did the shape cut out by hand. I opted to do a reverse bevel primarily as I haven't done too much with hand shaped mats, so wasn't sure how good my bevel would be, but it turned out fine.

Not too shabby, I then transferred the shape from the new mat to a piece of plywood approximately 16" x 11" and cut it out with a jigsaw and sanded. I did seal and paint the plywood black as you will see in future pics, as I wanted the inside of the back of the shadowbox to be as dark as possible since there will be some gaps and I wanted it to all be dark.

Finally, to finish the mat portion, I did the window cutouts for the photo and plaque and it all fit nicely.

Making the Shadowbox
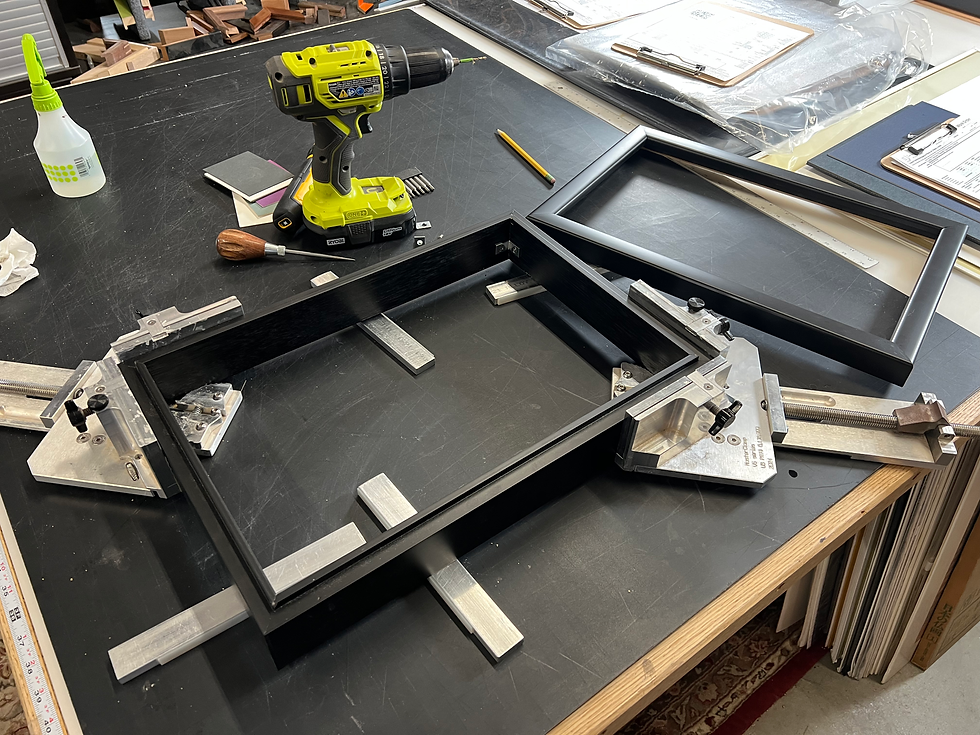
I haven't ever make a shadowbox using this moulding and extender, but all in all, nothing too complex and similar to making a folio box and a frame, but the mouldings and extenders save a large part of the effort. For the joining of the extenders, I had to break out my tall frame clamps - MasterClamps - When you need them, they are invaluable.
I also added some 90 degree angle brackets for strength as it wasnt practical to use the V-Nailer after the glue up. I joined the main top frame first, then meticulously measured and cut the pieces for the extenders so that the fit was PERFECT (which it was!).
Mounting the Asphalt
The actual mounting of the asphalt took most of a Saturday but as always, the mounting is always the most complex part of most framing projects.
My general execution was to turn the plywood upside down and fit the asphalt right where I wanted it, then commenced with using foam core to build a cradle around asphalt, layer by layer with PVA glue (on the foam core, not the asphalt). The asphalt sticks out of the back about 1.75", so it used up every tiny bit of the height of the shadowbox.

After the main cradle was completed and the asphalt was firmly being held and supported, I added additional foam core pillars to bring the support height up to the internal height of the rear of the shadowbox.

I forgot to take pictures, but there was a step in between if creating some spacers which are between the glass and the mounted package. Those were just created with 3/4" strips of foam core with matching mat strips glued on top. Ahhh…found the pics!


Fitting this piece into the rear of the shadow box below was uneventful. While the top frame is fitted in place below, it is actually removable for now so that I can remove any debris that might fall as well as to remove the protective sheets and board so the Museum Glass doesn't get damaged.
I added some 1/2" foam core blocks around the edge for additional support but there are also some framer points around the plywood which is also holding it in. I did use some hot glue to secure the foam core blocks to the plywood so they would accidentally fall off and rattle around.

Whew....ok..what was next?
Finishing the Back
I didn't take too many pictures but the back has a piece of GatorFoam which is a wood veneer over foam board, very strong but light weight. This was taped into place and then I will eventually fit a piece of black mounting board over, add the framer label, hanging hardware including WallBuddies due to its weight.

Some finishing touches and all, but this was the final result. The End.

Disclaimer: Any links provided are direct links. SecondMoonshot is not an affiliate for any manufacturer, product, or service referenced. We independently purchase and use the products and services mentioned.

Comments